Pages

Wednesday, April 29, 2015

Hungry Girl - Chocolate Chip Scones

My sister and I, in addition to crafting, did some baking as well.  She has been obsessed with Hungry Girl lately.  Her wedding is coming up soon, so she is trying to be good.  Therefore, she had a few recipes for us to try - I make a great guinea pig!

Hungry Girl Chocolate Chip Scones - Click on the link to get the recipe.  Since I didn't create the recipe, I don't want to put it down here.


Verdict:
3 stars - From start to finish, these scones were made pretty quickly.  The main issue was the ingredients that were needed.  Many were not ones either of us usually have on hand (although maybe we would if either of us were healthier).  The tasted okay - nothing to write home about.  We decided that since they were just okay, the scones were not ones we need to make again.

Monday, April 27, 2015

More Button Hangings - Valentine's Day and Christmas

I have made a wall hanging with buttons for St. Patrick's Day.  I loved how it turned out.  Because of this, I spent some time making one for Valentine's Day and Christmas.  

Directions:
1.  Cut out a shape (make sure it has color - bits can be seen) that you want to cover.
2.  Make an even layer of buttons covering the shape.
3.  Add another layer of buttons intermittently on top of the bottom row of buttons.  This gives it a nice dimension to the project.


Verdict:
5 Stars - Once again, these projects were simple.  They are a bit time consuming as it does take time to glue on each individual button.  I think that I still want to find little presents to put under the Christmas tree.  I like how cheap these were to make too.  Plus, while I made these, my sister was crafting Christmas cards.  We were both very productive!

These are the cards my sister crafted while I made the decorations above.


Thursday, April 16, 2015

Coffee Hair Dye

Keeping with the coffee theme, I decided to try coffee to dye my hair.

Directions:
1.  Mix 1 cup conditioner with 1/2 cup cooled coffee, and 1 tablespoon instant coffee.
2.  Put mixture on hair and cover with shower cap.
3.  Let mixture soak into hair for 1 hour.
4.  Rinse mixture out of hair and shampoo like normal.

Verdict:
2 stars - This did not dye my hair at all.  The concoction made for an incredible leave-in conditioning treatment.  It didn't serve its purpose, but I am happy with my hair.

Tuesday, April 14, 2015

Coffee Cellulite Bars

Directions:
1.  Melt 1 cup of coconut oil.  It took about 1 minute to melt in the microwave.
2.  Mix melted coconut oil with 1 cup of coffee grounds.
3.  Place mixture into muffin tins.  I used silicone ones to make it easier to remove.
4.  Once the mixture has completely cooled, remove from muffin tins.
5.  Use bars in the shower.  Freeze any bars that aren't being used.


Verdict:
4 stars - These are very easy to make.  I don't really know how well they work.  However, my skin felt incredible from the coconut oil.  It also has a nice smell perfect for waking up in the morning. The only downer with this is the mess from the coffee in the shower.  At least it goes down the drain pretty easy.

Sunday, April 12, 2015

Easter Egg Craft

I know that Easter is over.  One thing I wanted to make before Easter but never got around to was making Easter eggs to put in a decorative vase.  I decided to make them after so they would be ready for next year.

Directions:
1.  Blow up a water balloon in the shape/size that you want.
2.  Wrap yarn around the water balloon.
3.  Paint Mod Podge onto the yarn.
4.  Let the yarn dry completely and then pop the balloon.  Take the balloon out.


Verdict:
1 star - The top one looks better.  I followed the directions on top for that one.  Unfortunately, some of the yarn did harden.  I knew that I was having trouble from the beginning.  Therefore, I tried dipping the yarn in the bottom one into Mod Podge first and then putting it on the balloon.  It left a weird residue all over the balloon.  Both of these up close do not look good.  At least the top one looks nice in a photo.  This project was messy, time consuming, and a waste.  Now I need to find something else for my decorative vases.

Friday, April 10, 2015

St. Patrick's Day Wall Hanging


I know it is well after St. Patrick's Day.  However, I am behind in putting things up.  I admit that I got this done on St. Patrick's Day at around 10 at night just so I could say that I got it done in time to hang up for the holiday.

Directions:
1.  Find a shamrock print and cut it out of green construction paper.
2.  Glue it onto a background.  I have had a small stack of rainbow paper for a long time and never had a use for it until I made this.
3.  Hot glue buttons on the shamrock.  I used a variety of shapes and 2 different shades.  I liked the look of the shamrock once I started layering the buttons.  I found that it looked too dull without the layered look.

Verdict:
5 stars - It is hard to find St. Patrick's Day decorations.  While I burned a few layers of skin with the glue gun, it was worth it.  It has inspired me to make one for Valentine's Day and one for Christmas. I like the simplicity of this project.

Wednesday, April 8, 2015

More Easter Decorations

Carrot Silverware

Complete directions on how to put these together can be found here.  The difficulty I had with this was finding orange napkins.  I had to order them from Amazon.  The green silverware was much easier to find - the dollar store.  I also found this cute, brown Kleenex box holder to put the silverware in (I thought it worked because it simulated dirt).


5 Stars - This is a super simple activity.  It looks really good when filled with silverware.  The above was my after picture with leftover silverware.


Bunny Napkins

Complete directions on making these bunnies can be found here.  The directions are step by step but will still require some trial and error to put them together.


4 Stars - I thought these turned out pretty well.  While they came out cute, they are difficult to make at first.  The first one I made was folded and refolded many times.  It is a tight fit when putting the finishing fold in.  However, because it is a tight fit, they do stay together well.  Once the first one is made, the others are much easier to make.

Monday, April 6, 2015

Bunny Favors

It has been awhile since I have written anything.  It's amazing how time flies by!  Yesterday I hosted Easter for my family.  We had a great time.  I have decided to dedicate the next few posts to some crafts/foods that I created (all found on Pinterest of course).

Bunny Favors

Directions:
1.  Wrap m&m's in tulle.  Seal with a piece of pipe cleaner.  Make sure to leave a puff out for the bunny's tale.
2.  Use a small Styrofoam ball for the bunny's head (1 and 1/2 or 2 inches).
3.  Glue 2 eyes, 2 white pom poms and a small pink pom pom on to make the face.
4.  Use a white and pink pipe cleaner to form the ears and put them on the top of the bunny's head.
5.  To connect the head, poke a small piece of pipe cleaner through the tulle.  Fold the pipe cleaner into two pieces and poke through the bottom of the head.  This will hold it in place.


Verdict:
4 stars - These weren't too bad to make.  The only thing that was tough was the getting the head to stay on top.  In the directions, I added folding the pipe cleaner to connect the head to the body.  This definitely kept the bunny together.  The only thing that I wasn't happy with was how the head didn't always rest perfectly on the body.  I am too much of a perfectionist!

Tuesday, February 24, 2015

Vanilla Cake Mix Cookies

I am looking for some non-chocolate treats.  I found an easy recipe on Made by Me, Shared with You.  Basically, all one needs to do is add eggs, vanilla, and oil to a cake mix, roll the dough into small balls, and roll the balls in powdered sugar.


Verdict:
4 stars - These cookies were really yummy and easy to make.  The only thing I noticed was that the powdered sugar soaked into my cookies.  I used a yellow cake mix that had candies in it to add some color.  Overall, this was a pretty good snack.

Sunday, February 22, 2015

Wood Refinisher

I miss the holidays.  I decorate the railings in my house with green garland.  It looks so pretty.  Now that it has been off for a while, I really notice how bad the railings look.  Between my two cats and the green garland, my railings look really scratched up.  I actually dread going upstairs because I do not want to look at them.

How To:
Mix together 1/4 cup white vinegar and 3/4 cup olive oil.  Use a rag, dipped in the mixture, and wipe down the wood.
Before

After

Verdict:
5 stars - It was like I was erase all the little nicks in the wood.  The difference was amazing.  The only slight issue was that this mixture left a slight residue on the railing.  This can be felt when you touch the railing.  It can't be seen.  I am okay with this as my railing look amazing.

Thursday, February 19, 2015

Sponges as Fabric Softener Sheets

I must admit when I saw using sponges instead of fabric softener sheets, I was more interested in making this up instead of thinking about how much better it would be for the environment.  Oh well, whatever the reason, this is an easy activity.

How-To:
1.  Cut sponges in half lengthwise.
2.  Put them in a jar (make sure you can actually seal it).
3.  Pour in the liquid fabric softener of your choice.
4.  Each time you dry a load of laundry, pull out a sponge.  Wring off the excess fabric softener and place it in the dryer.  This will keep your clothes static free.


Verdict:
5 stars - I don't know why this project appealed to me so much - I don't go through that many fabric softener sheets.  The project was very easy to do - couldn't be easier.  My clothes came out smelling really nice and static free.  Fair warning, it does get a little messy wringing out the sponges each time but it does make my hands soft and smell nice.

Tuesday, February 17, 2015

Shower Soothers for a Cold

Vicks used to sell Shower Soothers.  I loved these things when I was sick with a cold.  Unfortunately, I can't find them in the store at all and haven't even seen them in years.  This led me to find a make your own recipe for them.  There are tons of different recipes out there.  Below is the one I used.

Shower Soothers How-To:
1.  Mix one cup baking soda and 1/2 cup of cornstarch.
2.  Add 1/3 to 1/2 cup of water.  Start with a small amount and add only what is needed to mix everything together.
3.  Fill cupcake liners with the mixture.
4.  Let mixture dry overnight or cook in the oven at 350 degrees for 10 minutes.  I find cooking them keeps the shape better.
5.  Add 15 drops Eucalyptus and 15 drops Rosemary Essential Oils. (Add more or less depending on your needs/wants.)
6.  Remove a shower soother from the cupcake liner and place on the floor of the shower whenever you are sick.  This will help your sinuses open up.


Verdict:
5 stars - This is one of my go-to's when I get sick.  They hold up very well.  One shower soother could last multiple showers.  I like to make them when I am feeling healthy because doing anything when you're sick is difficult to do. They last a really long time.  If the scent seems to be diminished, add more essential oils.

Saturday, February 14, 2015

Honey for a Sore Throat

A couple of days ago, I started to feel sick.  For me, the first step is almost always a sore throat. Since I was about to have a few days off of work, I definitely did not want to start off sick.  One remedy for a sore throat involved apple cider vinegar and honey.  I can do the honey but I can't stomach apple cider vinegar - I have tried but it always leads to failure.

Verdict:
5 stars - I took a spoonful of honey before bed and another one when I woke up.  My sore throat completely disappeared.  Now, it is not a miracle cure.  However, I do feel better overall.  Hopefully, I have warded off the worse of a potential sickness.  From now on, my first line of defense will be a spoonful of honey.

Tuesday, February 10, 2015

Skin Brightening Astringent

Make your own astringent to brighten your skin.  That was the claim that this astringent made. Does it work?  That was the test.

How To:
Mix together 1/2 cup of lemon juice, 1 cup of water, 2/3 cup of Witch hazel.  Apply to skin with a cotton ball.


Verdict:
3 stars - I wish I took before and after pictures, so I can really see if there was a difference.  I feel like the dark circles under my eyes went away when using this once a day.  The problem was that it really dried out my skin, even after using a heavy moisturizer after applying the mixture.  I had to stop because my face was too dried out.  The dark circles are back.  Oh well, the cons of this did not outweigh the pros for me.

Sunday, February 8, 2015

Snowman Pillow

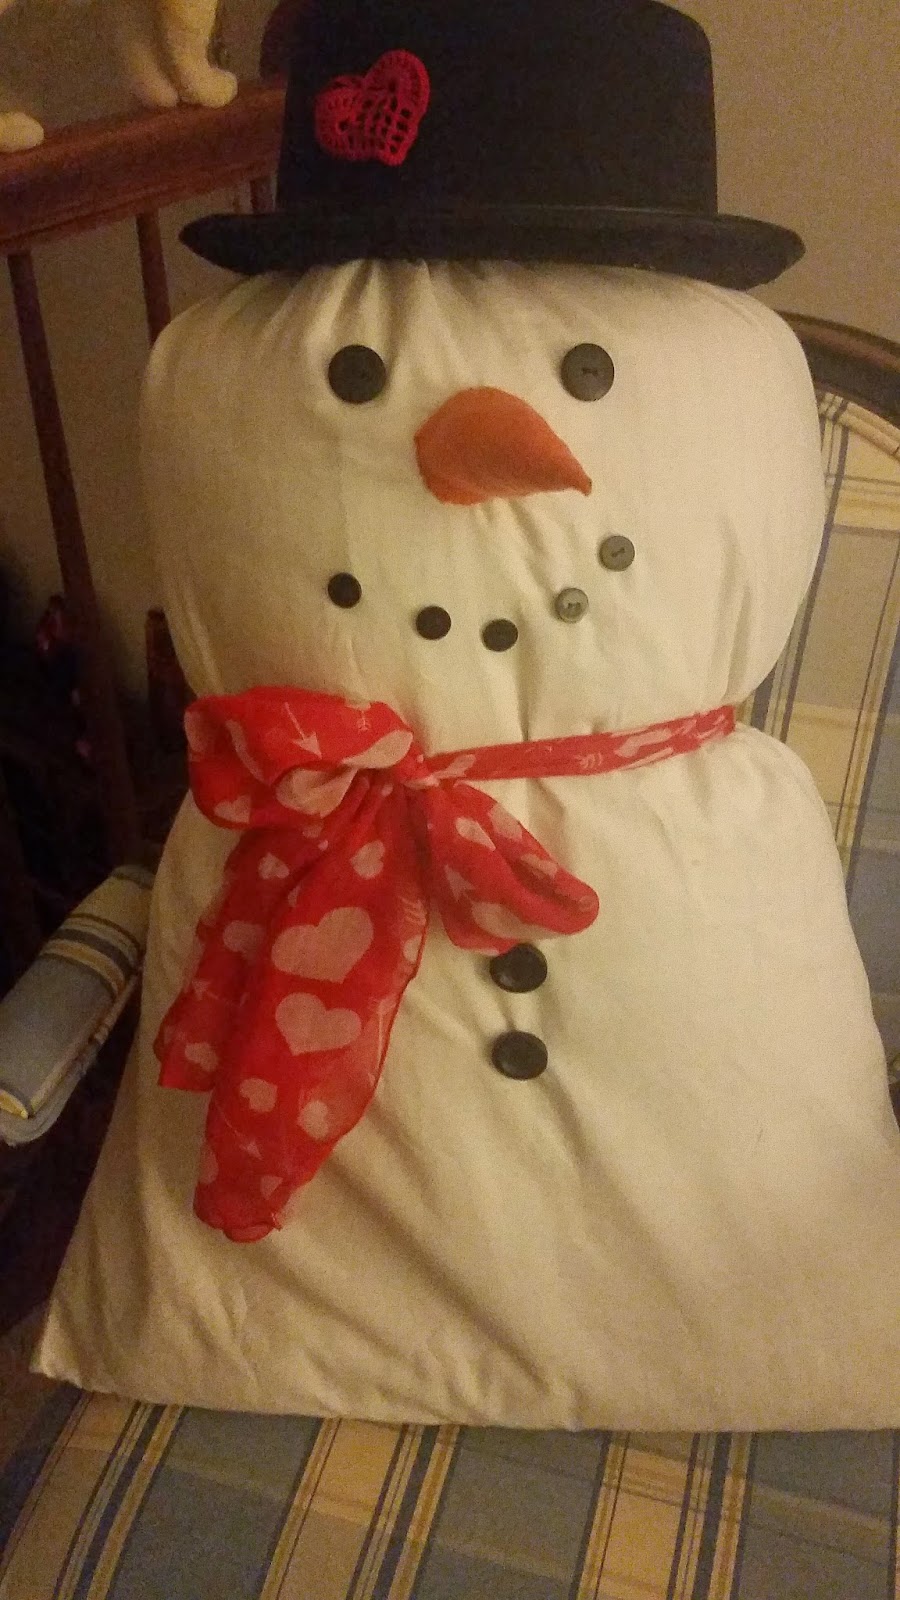
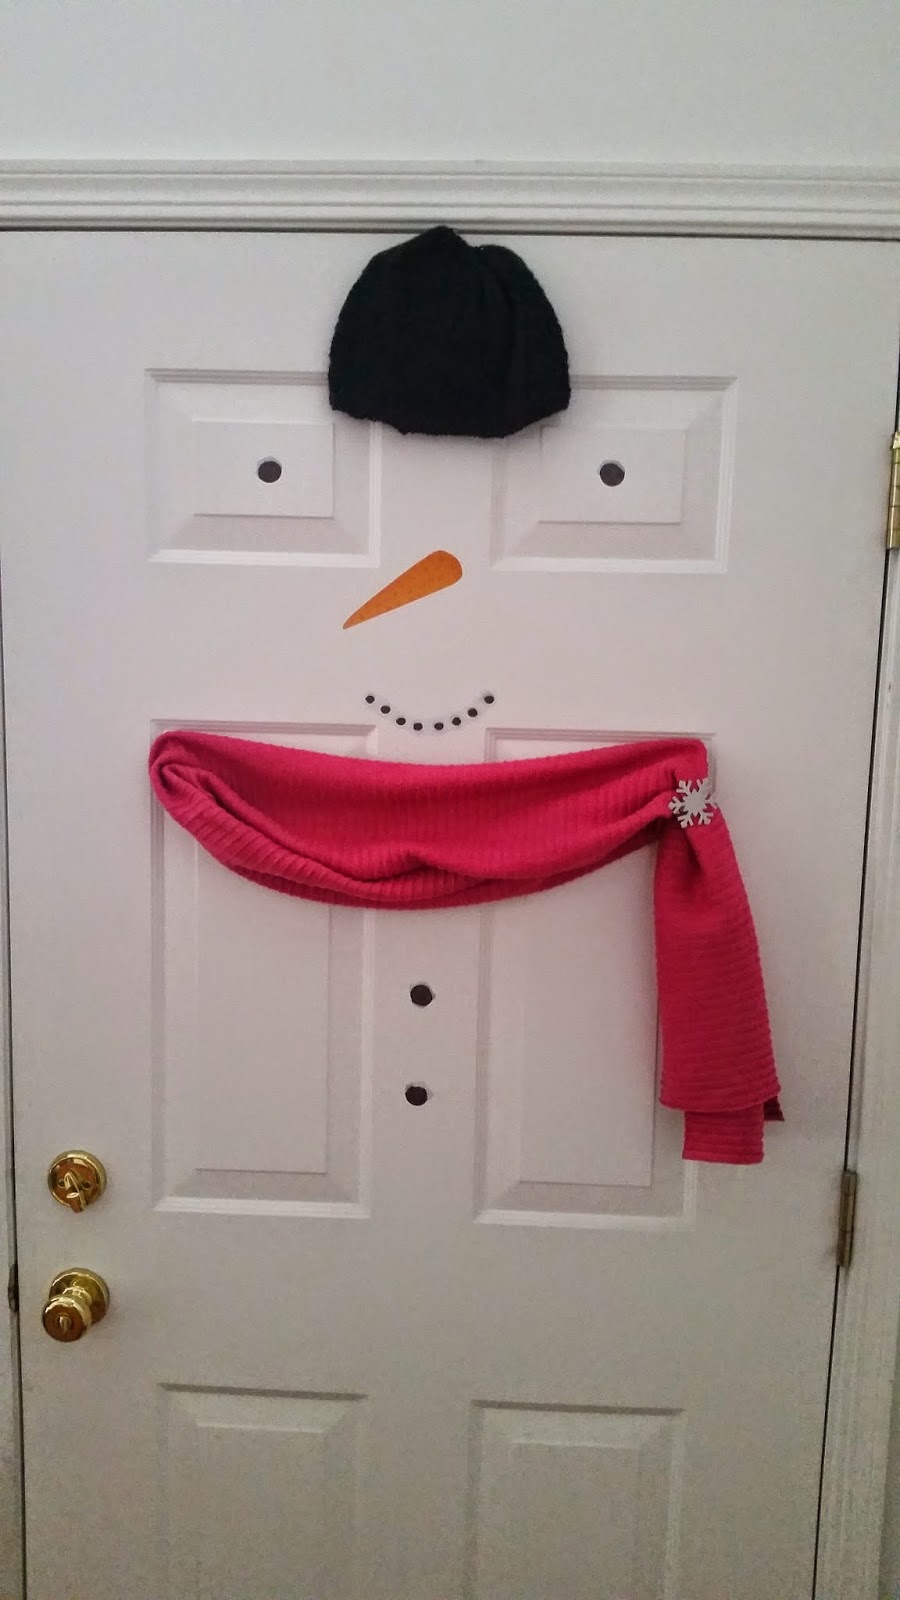
I have been in a crafty move.  Unfortunately, I was really lazy about finishing all of the projects I started.  One project that I finally finished was a snowman pillow.  It only took me 3 weeks.

Materials:
Old Pillow
Orange Felt
Orange Thread
Black Buttons
Hat (I ordered one from Amazon.)
White pillowcase
Black Thread
Fabric Glue
Polyfill (I cheated and used cotton balls.)
Scarf' (Mine is from the dollar store.)
Any other accessories you want
Rubber band

How To:
1.  Use the rubber band to tie the pillow case up.
2.  Tie the scarf about 1/3 of the pillow's length below the rubber band.
3.  Use the fabric glue to tentatively glue on the buttons where you want them.
4.  Trace a cone net onto the orange felt.  Cut it out and put it together.  Stuff with polyfill.
5.  Glue this onto the snowman.
6.  I recommend sewing the buttons and nose onto the snowman as it will make everything more permanent.
7.  Add your embellishments.


Verdict:
4 stars - This was a relatively easy project to complete.    It is time consuming to make though (or just seemed like it since I only worked on it in small increments over a long period of time).  My goal was to get it done in January but that didn't happen.  At least my snowman is ready for Valentine's Day. At the dollar store, I picked up a St. Patrick's Day scarf and hat.  This simple change will keep my snowman able to be up a couple months a year.

Thursday, February 5, 2015

Water at Bedtime

One of the most fascinating things that I read was about how dehydrated people get while sleeping.   (I can go into the science behind it, but that is boring.) For some reason, that really resonated with me.  Yeah, I would wake up with dry mouth but that's because I am a mouth breather.

If you are accident prone (like me), then use a water bottle!


Verdict:
5 stars - I cannot imagine a night where I do not have my water next to my bed.  I often wake up in the middle of the night.  If I do, I take a quick sip of water.  I find that I feel much better in the morning.  I will finish the water in the morning.  The weird thing is that I think drinking the water also helps combat morning breath.  Now, I can't get to bed without my water.

Tuesday, February 3, 2015

Snow Ice Cream

Blizzard 2015 hit my area over the weekend.  What better way to celebrate (yes, celebrate) than to make Snow Ice Cream.

Ingredients:
4 cups of snow
1 cup of milk
1/4 cup of sugar
1 tsp. vanilla

Directions:
1.  Gather 4 cups of nice white (duh!) snow.
2.  Mix all ingredients together.
3.  Add any toppings you prefer and eat!


Verdict:
5 stars - This is yummy!  It does melt fast, so eat quickly.  It is a great activity to make with kids or with those that are kids at heart!

Sunday, February 1, 2015

Body Wrap

Going to the spa and getting a body wrap would be very nice.  The only problem is that it is way out of my budget.  To compromise, I tried an at home wrap involving only plastic wrap, cellulite lotion, and vitamin E (I used a cream that is primarily vitamin E since this was cheaper).  This wrap is supposed to remove "inches" off my body.

How To:
1.  Slather yourself with the cellulite lotion (to help with your pouch) and vitamin E (to help with stretch marks).
2.  Wrap up your self in the plastic wrap.
3.  Lay under a blanket for an hour.  That's it - although you will definitely want a shower after!


The Verdict:
5 stars - I actually measured myself and found that I did lose an inch.  The wrap didn't hurt at all, although the cream was ice cold.  I did feel like I was getting a spa treatment at home!  While I have only tried this on my stomach area, I do have a friend that does this treatment on her thighs and arms. Maybe this is something I will try in the future.

Saturday, January 31, 2015

Tuesday, January 27, 2015

Designing Closets

I have amazing closets in my home.  The only issue I have is that most of them have wire shelves. The solution is to take old floor tiles and place them on top of the shelves.  Now, nothing falls through.


Verdict:
5 stars - I found a ton of tiles in my utility closet (I really need to clean more often - who knows what else I will find).  This find made this project extremely easy to complete.  I was so happy with my bathroom closet that I also did my pantry.  I added the baskets and cute chalkboard labels to really make the closet look great.  My favorite part is that nothing falls through the cracks anymore.

Sunday, January 25, 2015

Hydrogen Peroxide as Acne Killer

Hydrogen peroxide is said to help eliminate acne when used on a daily basis.  After washing your face, dip a cotton ball in peroxide and rub over your face.

Verdict:
4 stars - I think that actually washing my face twice a day has made a bigger difference than hydrogen peroxide.  Even after washing my face, I sometimes noticed that there was additional gunk on the cotton ball.  My face felt really clean after using the peroxide.  The peroxide does dry out the face, so a moisturizer is definitely a must after using it.

Tuesday, January 20, 2015

Suppress a Cough at Night

I hate getting sick!  I know that no one likes it, but I get stubborn when I am sick.  I have to teach and try to miss as little school as possible.  How do I help myself when getting sick?  Simple, all I need is Vicks and socks.

Directions:
Slather Vicks on your feet.  Put a pair of socks on your feet.  That's it.

Verdict:
5 stars - This may not suppress your cough 100%, but there is a notable improvement.  Bonus, my feet feel warmer and softer after using this.  I must admit, when I am feeling sick, I put this on to help get me through the day (not just at night).  Because it is on your feet and covered, the smell is not noticeable.  This little trick helped get me through the flu and a cold in December.  Regular use has also kept my feet feeling like I get regular pedicures.  In short, I highly recommend this!

Thursday, January 15, 2015

Eliminating Stubborn Spots on Carpet

I had a couple of grease stains on my carpet that would not go away, no matter how much I cleaned them with different products.  This brought me to find a ton of pins using baking soda and vinegar.

Directions:
1.  Pour baking soda onto your stain - enough to lightly cover it.
2.  Pour vinegar over the baking soda - enough to react with all of the baking soda.
3.  Let the mixture set for 15-20 minutes.
4.  Rub with a damp, white cloth.  This may still take a little effort.  (Make sure the cloth is white as colors may get absorbed into your carpet.)
5.  Vacuum the area when dry.

Bubbling up with vinegar and baking soda.


Before


After


Verdict:  
4 stars - The difference is amazing in the before and after pictures.  Not sure why the carpet looks so different,  I think it may have been the time of day because it is the same spot in all three pictures.  I only gave this 4 stars because it worked well on small stains.  The bigger the stain, the more it did not seem to work the same.  I am going to go back over some stains at home.  Hopefully the second time will work better.

Tuesday, January 13, 2015

Cleaning Your Stove Top

Must Do!!!!!

I cleaned my stove top today.  I must admit that it was pretty disgusting.  There are two different parts to doing this.

Part 1 - Grate Directions -
1.  Put each grate in it's own gallon sized bag.  Add in a few tablespoons of ammonia.  Do not add enough to cover the grate.  The gases from the ammonia will clean the grate.
2.  Seal the bag and put it aside 12 hours or overnight.
3.  Be careful opening the bags, there smell will be awful!  Rinse of and gently scrub each grate.  The dirt and grime will easily come off.

Part 2 - Stove Top Directions -
1.  Sprinkle baking soda around on each spot you want cleaned.  Pour a few tablespoons on the baking soda (not enough to soak everything - just enough to wet the baking soda).
2.  Let mixture stand for 15-20 minutes.
3.  Wet a paper towel or cloth and wipe up your mixture.  There should be very little scrubbing as many of the stains will come right off.  I even took some of this and wiped down the top of the stove top (where the time is) and could not get over the difference.


Before                                         After
 

     Cleaning Grates                        Cleaning the Stove Top


Verdict:
5 Stars!!! - I cannot get over what a huge improvement there was in my stove.  I have tried cleaning the grates before but never the stove top itself.  It was so gross but I didn't want to spend a ton of time scrubbing.  My stove top looks brand new.  The difference was overwhelming.  It's so sad how excited this project made me.  I sent pictures to my best friend and mom because I was so excited.  I guess it is the little things in life that make you happy.

Sunday, January 11, 2015

Vinegar + Baking Soda = More Absorbent Towels

I ran to the store today and majorly stocked up on vinegar and baking soda.  It seems that almost everything I find, cleaning wise, on Pinterest calls for these two items.

One thing I found was using these on your towels would make them more absorbent.

Directions
1.  Pour 1 cup of vinegar into the washer with your towels.  Run through a normal cycle using hot water.
2.  When that load is complete, pour 1 cup of baking soda into the washer and run through a normal cycle using hot water.
3.  Dry towels as you normally do.
* Do not use laundry detergent to wash your towels!


Verdict:
3 stars - I was amazed how the vinegar smell was completely gone after the load with the baking soda.  This was my biggest concern.  I didn't notice that the towels were more absorbent after using them, but I did feel that they were really clean.  As a bonus, the whites were much brighter!

Friday, January 9, 2015

Leg Lift Challenge

I am constantly seeing workout challenges for each month.  I searched for a good workout for January.  Most of the ones I found had calendars for previous years.  I could have followed one of them but decided that I wanted something different.  I came across the Leg Lift Challenge here. While the name of it is leg lift, it is similar to a crunch in how it feels.

I am on day 9, still going strong.  It feels good...once I am done for the day, not so good while completing the challenge.  There was only 1 day that I almost forgot about it!  My plan is challenge myself each month to a different plan.  I will let you know how the rest of the month ends up!

Thursday, January 8, 2015

Water Bottle/Coffee Mug Holders

I had a bunch of coffee mugs and extra water bottles that kept rolling over in my cabinets.  This did not even include the mugs/water bottles that are seasonal.  When I saw this simple organization on Pinterest, I thought that it was pure genius.  It was a moment in which I realized, "Why didn't I think of this?"  

All you need to do is buy on an over the door shoe rack and put it in your pantry.  It can even be cut down to fit inside a cabinet.  The only thing I changed was that I used command hooks instead of the over the door hooks that came with the shoe organizer.  I attached a ribbon to them to hook them up.  I just didn't want the hooks to show in a main area of the house.


Variations:
Use the over the door rack as storage for cleaning supplies or kid's toys.

Wednesday, January 7, 2015

Lip Balm

I loved the idea of making different lip balms in lots of different colors very cheaply.

Directions:
Heat up and mix one cup of Vaseline with one packet of Kool-aid.  Put in individual containers to cool.


Verdict:
2 stars - I did not like how this mixed together.  If you look closely, it seemed to separate a bit on top when it cooled.  This may have caused there to be no color when I first used it.  I haven't used it long enough to see how the color will look when I use the lip balm.  I also did not like the smell the Vaseline made when it was heated up.  This was strange because I did not notice the smell before the Vaseline was heated.  Even after the mixture cooled, I could only notice the smell.  In the end, it was like putting regular Vaseline on your lips.  This is something I would not make again.  Not everything on Pinterest is a winner.

Saturday, January 3, 2015

Garbage Disposal Tabs

I have made these garbage disposal tabs in the past.  I love them!  They are super easy to make and the kitchen smells incredible.  Click here for the blog I used with all of the directions.


Ingredients:
baking soda, salt, lemon, liquid dish soap


My Garbage Disposal Tabs - drying out overnight before I use them.


Verdict:
5 stars - These are easy to make.  No special ingredients need to be bought,  They smell amazing!

Friday, January 2, 2015

Decorating the Door with a Snowman

I love winter and decorating my house.  This year I decided to try decorating my front door.  I must admit, I took some shortcuts - I used leftover pieces I found in a wall decorating kit I bought on clearance.


I took a knit hat my sister made for the hat on top.  I have an over the door hanger for the front door that has a little hook on the back.  This was perfect to help hold the hat.  I used command hooks to hold the scarf up.  The snowflake is a napkin holder.

My Front Door

The Snowman Decorating Wall Kit

Verdict:
4 Stars - This was an easy project to complete.  I think I would like this better if I actually took the time to make new eyes, mouth, and buttons.  This would help make it a bit more proportional.  Until then, I will take my lazy snowman!

Thursday, January 1, 2015

Cleaning Make-up Brushes

I used to always buy cheap make-up brushes.  Every so often I would throw them away and get a new one.  This was so wasteful.  Even though the brushes were cheap, the price on them began to add up. This all changed when I decided to invest in some great brushes.  Now I need to clean them on a regular basis.  I know that I need to do this more often than I do but at least it gets done.

How to Clean Make-up Brushes:
1.  Add one tablespoon vinegar to one cup of hot water.
2.  Soak brushes for 20 minutes.  I make sure to shake press the brushes against the side of the cups in order to shake off as much gunk as possible.
3.  Run the brushes under hot water.  Make sure they are thoroughly rinsed off.


Verdict:
5 stars  - It works!  I got a lot of stuff off of the brushes.  The cup shows some of the stuff that came off.  More stuff came off when I rinsed the brushes.  It was a very easy project to complete!  Very little effort is needed to complete.

Potential Issues:
Having done this before, I did notice that there was a lingering vinegar smell long after this project has been completed.  This may bother people that are sensitive to strong smells.